Thursday, September 29, 2011

Making Project Progress

My largest stash of holiday decorations is for the Fall. Over the years, the bin has filled up and the scarecrows now need their own zip code. So many of the items come from local dollar stores and sometimes need a little help to bring out their full potential. Not a problem. With almost 120 shades of colors, I should be able to handle that. Some of the new decos are spiffed up and hanging around the house already. Often I've thought of leaving them up all year round, except at Christmas time, of course. Every year there's something new to add. This year, for some unknown reason, it exploded. Halloween (at my age!) decided to happen.

Altoid tins are fun to work on, I think, primarily because they're small, which makes them challenging. And if there's a challenge peeking around the corner, I'll grab it by it's little neck and hang on for dear life. So starts the ride of this Autumn tin.
After the basecoat of gesso was dry, I splashed on 2 coats of Linen paint, letting it dry between coats and cutting out the parts of the ribbon I would Mod Podge on the tin top.

The background color of the ribbon almost exactly matches the Linen paint, so I didn't stress too much about cutting around all those tiny vines. Actually, I didn't want to take the chance of warping the vine during placement and and keeping it attached to the pumpkin would keep it stable enough to handle easily. Feeling confident enough, I went ahead and attached the cut outs.


Until just this morning, my head refused to give me any idea for a background, but after this post I'll get right on it.

My Halloween wreath is a work in progress. All of the little bits and pieces are not complete quite yet. The larger of these two jack-o-lanterns will sit up on the bottom of the wreath right next to the gnarly tree. The tiny 'jack' is for the cap of a round bottle that I am painting like a jack-o-lantern, which will sit on a glass pedestal that's been painted in Halloween colors. This is the tricky (no pun intended) project and it'll probably be done the night before Halloween. I can be such a procrastinator.

Halloween needs tombstones like Christmas needs ribbon candy, so I plopped some clay into candy molds and made three for the wreath. Still in progress.


The Trick or Treat bags for my granddaughter and her two sisters have been, well, FUN! With everything I have on hand, they just had to be made. There are a few more tiny things to glue on them- more sparkle and glitter- and then the handles- easy to do. On these projects, I used a plain white tablecloth. After testing, the stitching stayed strong. Nothing tore. Initially, I'd been afraid the stitching would act more like perforation and any weight in the bag would tear it, but so far, so good. Here's how they look right now.

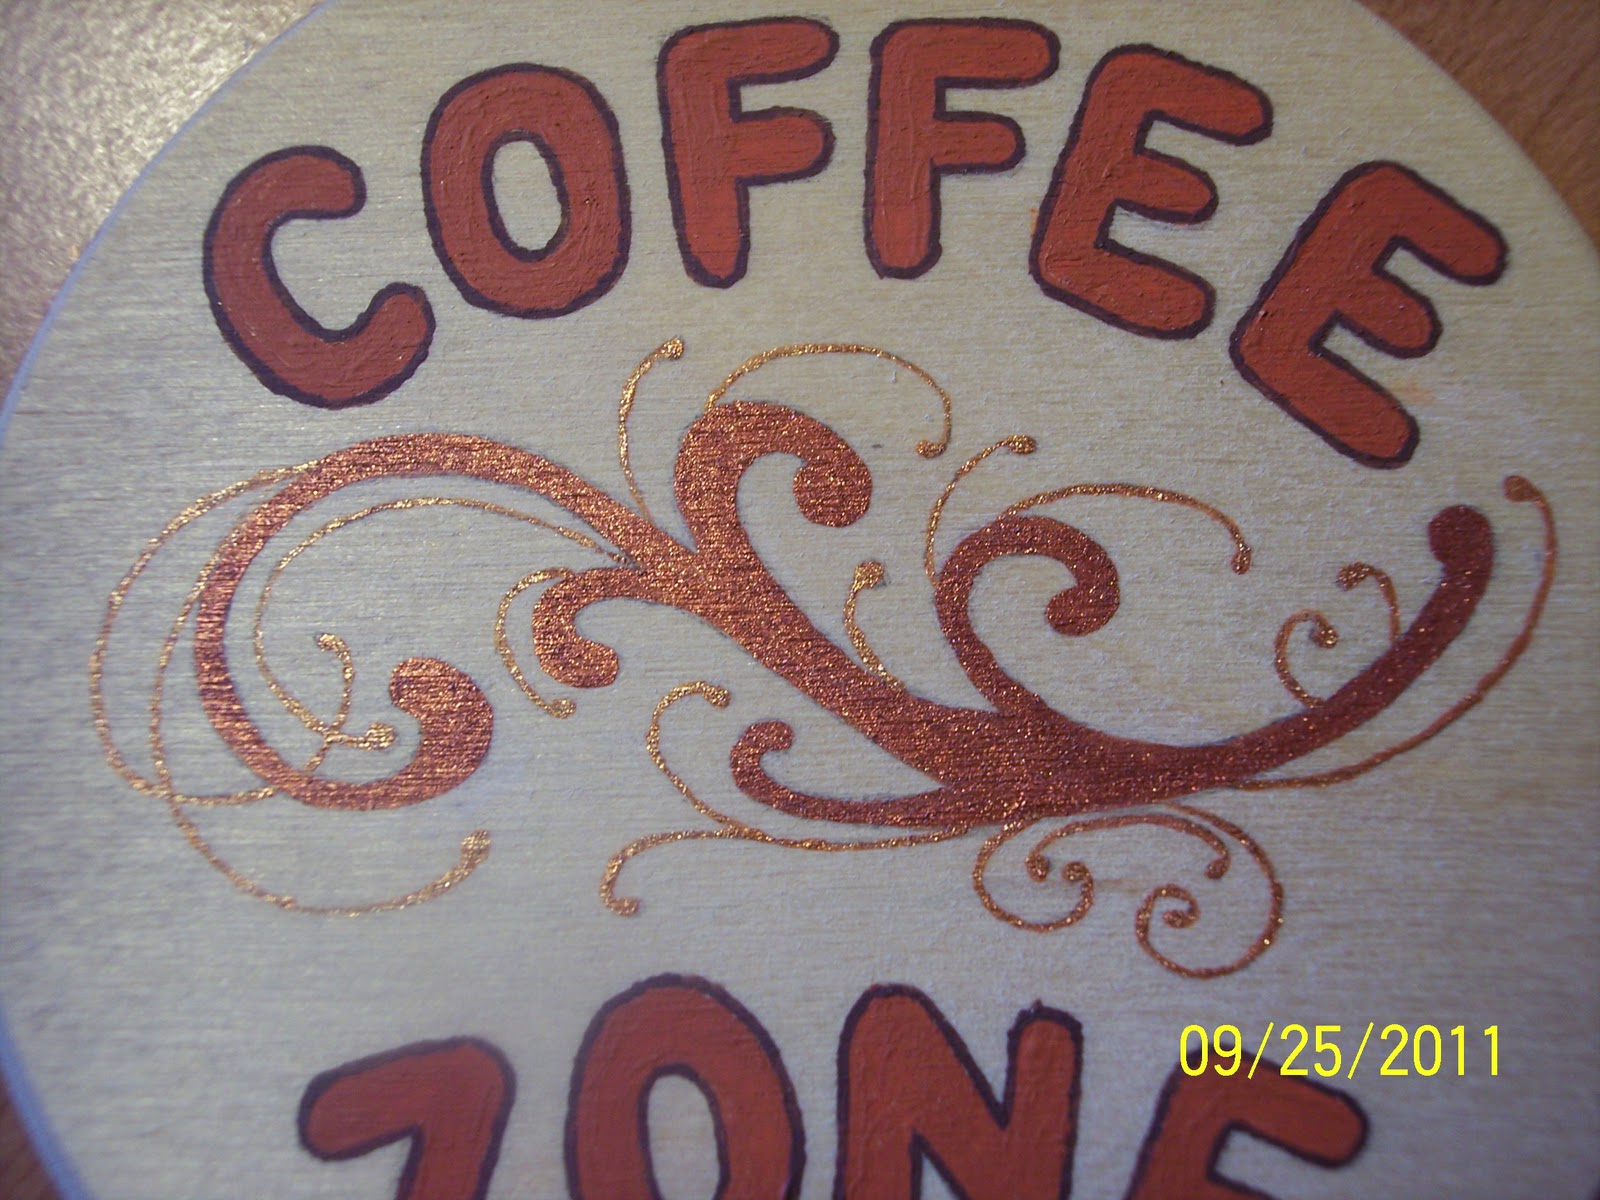
Now it was time for a break. This project popped into view early in the morning and I was glad. I needed to focus on a short project with lots of lines and painting. This poor round wood plaque had been sitting on the shelf for the longest time with a huge question mark pulsing over the top of it. So, when inspiration turned up the power, I pounced.
I love my coffee. If I could drink it all day long without pinging off the walls, I would. When I get home from dialysis, I head right for the coffee. No exceptions. Believe me, I need it. Part of my kitchen counter houses a large brew station and my faithful, but much abused brew n' go, with the cabinet above it stocked with all the essentials. There's even instant coffee (ugh) for when the power goes out. The little plaque could work well on the blank wall over the machines.
After the stencil was worked up, I started tracing.


 Earthy colors are my favorite, so picking the shade Pueblo was natural for me. But it needed a little punch.

 Using my color sheet, I matched the Pueblo with copper metallic, which would give it that little certain something on the glam side that I felt was needed. That done, let's go for some contrast.

 Matching colors again, the bronze metallic won the toss for the delicate line work. I've had a set of 20/0 brushes for a while now and really haven't put them to use- until now. My hand was into the swing, so to speak. I felt comfortable. Confidence crept in. Let's go for it! But first, let's outline.

 And the color shade? Can you guess? Coffee Bean!!! (the crowd goes wild)
Next up- a coffee break. Much needed and deserved. We're getting there.
This is my favorite part- the contrasting lines of the curves. It was one heck of a break-in for this tiny brush! And she performed superbly! Needless to say, she'll get used more on current and future projects.


Only a little more to go and there's not much to write about there. Just a small touch of color around the edge. The focus was the front of the plaque. And I liked it.
Here's a detail picture:


This project was done, well, except for the final spraying. Feeling satisfied, it was time to move back to other things. You know how that goes. The need was taken care of.
With a parting shot of the plaque, I must depart to finish the bags, the wreath, the vase, tombstones. Am I fading away yet?
Coffee Time!!!


Yes, there'll be a follow up.

Toodles.

Sunday, September 18, 2011

A Fun Mess

Fall is here in central New York State, which means Halloween is flying towards us at the speed of light. Normally, I don't do much decorating for Halloween. There are a few things here and there, but I add more scarecrows than anything else. Love a great scarecrow! Someday, I'm going to get really creative and make a scarecrow as big as life for my front porch, even though no one passing by would be able to see it. I would, and that's what counts.
For some reason, the Halloween decorating bug has bitten me. Halloween is fun. Decorating for Halloween is fun. Making decorations for Halloween is fun! As you can tell by my desk.


Being a dollar store hound, I'll get as many items there as I can to make things with. I've discovered some uses on a few that I wouldn't have thought of in the past. This year seems to be different. My mindset has changed and didn't give me any notice, but the change has been great. I tend to look at things very differently now. Everything has potential.
Here are a few decorations I've cooked up in my cauldron.


I have no idea where I got the idea for this next one. It just came about...

I found out that after I curl the ribbon, I can stretch it out, tape it down, and paint it!

So this mess is fun. I get so lost in it, that when I finally look at the clock, it's two or three hours later and I need a cup of coffee, badly!

All of these little things will be attached to a wreath that will hang on the porch, that no one but my husband and I will see. All the fun is worth it!

Happy Hauntings!

Toodles.

FabCopy

I thought it might be time for this particular post. There are so many great uses for FabCopy, and I've only come up with a handful. I'm sure someone out there in blogland will come up with more. If you do and you'd like to share your idea, drop me a line. I'd love to hear the feedback.
FabCopy, in my dictionary, is a paper copy of a piece of fabric, or an old book cover, or an old map, or a piece of needle work. It can be a paper copy of anything you like and might one day find a use for. Maybe you'd like to frame it? Or, as in my case, Mod Podge it to something. If you know and use Mod Podge, you know the possibilities are endless. If you come up with something unique, please, send me a picture. I love seeing what everyone else is doing. With all this said, let's start with my FabCopy file.

I keep my copies in their own individual clear sleeves, in their own binder. Just in the few months since I started this, I've had to move to a larger binder. This first copy started out as an actual quilt block that I purposely made for the FabCopy. Loving quilt blocks, I knew I would find scads of uses for it.


Notice my seams don't match up correctly. All the exact measuring, cutting, and sewing in the world does not mean my seams will match up. Oh well. There are ways around that with FabCopy.
The pieces in the sleeve are the leftovers from my mug. See my post 'Coffee Cup Patchwork' on how I maneuvered the FabCopy to form the pattern.


Another major plus to the FabCopy file is the escalating price of cotton fabric. Actually, it seems any type of fabric is going up in price, and I would hazard a guess it's because more people are sewing either clothes, crafts, quilts- most likely all three. And more. Times have turned to the point where homemade is both satisfying and economical. The word 'functional' should top the list, though.

Here are a few pictures of some cotton prints that I purchased primarily for my quilt. The patterns were interesting enough to copy.

This next copy has potential splashed all over it.


This is a copy of leaves I bought years ago. If I run out of the actual 'fabric' leaves, there's always a copy.

My mother embroidered these pillow cases for me, and they are beautiful, so into the copier it went! Thanks, Mom!!

One day, anything that would fit in the copier got copied. You just never know.

This is a copy of the old journal that holds my great grandmother's and great aunt's recipes. I love it's simple cover.

These are just a few of the copies in my FabCopy file. As new things show up in my life, like an interesting picture, I make a copy. Make a copy of your child's drawing and transfer it onto a Tshirt, or their bedroom curtains. Mod Podge it to their keepsake box or their backpack. There are just so many uses for the FabCopy. I continually find new ways.

FabCopy was developed, by me, to give me another facet of creating. It has done that. In introducing this to you, my reader, I hope to open an outlet for you!

Create. Inspire. Make.

Toodles.

Saturday, September 17, 2011

A No-Frills Drying Rack

The time had come to start drying some of the things that we managed to keep alive this year. They weren't many, but what did grow and produce needed to be taken care of. My husband took a coat hanger and hung it on a hook on the ceiling, taping up a few beautiful, ripe, bright red hot peppers.
Well, the tape didn't hold. The next step was to wrap heavy thread around the stems and hang them that way. That worked, but it just seemed there was something out of place. Not quite right. Not at it's full potential. It could be better!
A few things started rolling and bouncing around in my head, doing their usual jumbled and disorganized dance, trying to find their mark. Up popped a clothespin. Hmm.
Where there's one, there's more. Attach the clothespins to the coat hanger.
Okay! That's good. Attach how?
Glue.
 We can do that! But the coat hanger has a curve to it. The actual gluing surface is very small compared to the surface available on the clothespins. It was then that I remembered I had a very old wood coat hanger that was more flat than round. Let's go look. When I found it, into the studio it went.
This old hanger had been painted a horrible green a long time ago by my great aunt. There must have been a sale on that color, because so many things in my old house are that color, including the outside of the house. And mine's not the only one.
Anyway- my husband's favorite color is green, and he really likes this antique green acrylic that I have, so a slight change in color was called for. Here's the line-up:

The only pizzaz would have to be on the clothespins, and any color could only be on the front and sides. Any place on the clothespins that might come into contact with your herb or spice should be natural- unfinished, so as not to taint your hard-grown product.
Well, I didn't want to paint the clothespins the same color as the hanger, so I pulled out the color chart I made and found a good match with the peridot metallic. This paint pretty much finishes itself after it is dry.
Here's the mix:

I was happy with the match. After painting the tops of all eleven clothespins, I started on the sides:


 I stopped painting when both sides were done. The back, bottom, and top I left untouched and natural.

When the first coat of paint on the hanger was dry, it didn't look consistent. As you can see in the picture below, there is a definite difference between the left side (2 coats) and the right (1 coat). After the second coat was dry, I was satisfied. It was going to be hanging from an arched ceiling, so any holidays would not be readily apparent.


For a finish on the hanger, I chose a triple thick gloss than is brushed on. This was good because I did not want to apply finish on the front yet- at least not until after the clothespins were glued down. With the finish on and dried, I placed the clothespins in a few different positions, finally settling on the center of the pin for  the glue point. I let the glued pieces dry overnight and made sure they wouldn't slip or fall off when hanging from the ceiling. It's hotter up there, remember. Brushing the gloss on between the pins was the final step, and after an hour, the drying rack was done. And, a frost was due, so the rack was right on time to be put to use.
Here it is, happily doing it's job:

It was 35 degrees this morning. I haven't gone outside yet to see the state of the remaining plants, but I can imagine they're a little droopy and sad looking. One of the momma deer was just here with her baby and the baby she adopted, and momma is turning dark mighty fast. They love the apple trees we have on the property. The Autumnal Equinox is next Friday, but Mother Nature has her own time table and pays no attention to the calender. The trees are just starting to turn color, so Fall is here. Our harvest might not be up to our past standards, but it's something, which is better than nothing. I sincerely hope your harvest is everything you wanted it to be.

Toodles.

Thursday, September 15, 2011

The Colors of Summer

It seems like Fall is here in central New York State, and because it's here early, this little collection of summer colors can be made to wear around your wrist all year long to remember it.

Start by choosing your beads. These are 1/2" round wood and number 14. Grab your bamboo skewers and pop those little beads on the ends.


No matter what color a bead will end up being, I always basecoat it white first.
My basecoat paint of choice is a high hiding white latex that's rich and creamy with an easy soap and water clean up. It has a wonderful consistency and is true white with a quick drying time.


Pick out your colors. For this project, I chose bright, solid colors, well matched. Your color scheme can be anything- neons, pastels, rich deep tones. You name it. Give each bead it's own solid, single coat of paint and you'll be good to go, like so:
Prop each skewer and bead up in an empty container to let them air dry thoroughly. Get ready for the next to the last step. Grab a brush, your pearlizing medium, and a palette. Line up your colors so that they are pleasing to the eye and brush on a coat of the medium on each bead.
There might be times when you have to leave your working area to take care of something else, but you don't want what is on your palette to dry up while you're away. Here's a little tip: For the palette shown above, I cut a circle of clear plastic a little larger than an individual cup, with a small tab on it. Just inside the edge of the plastic, dab on some repositionable adhesive and let it dry. Now, when you need to drop everything, put your little cover over the cup and press down slightly to seal it until you are ready to use it again. Sometimes, I've mixed special colors in each cup and don't want to remix later in the day. For those times, I made a cover that tops the whole palette and keeps the paint wet for at least a day, sometimes more, depending on the heat. Works like a charm!
Back to the beads. While the medium is wet, it will have a milky look. Don't worry. It will dry and give each color its own individual look!


Depending on your weather, the beads will dry fairly quickly, but a rule of thumb for me is to let it dry for at least an hour.
The last step is the easiest, and that's good, considering you might be impatient to get it done and wear it!

Your choice on a clear finish is up to you. Just about anything will work- sprays, liquids, etc. Personally, I use clear fingernail polish on my beads. It's cheap, stays great, and keeps the more expensive liquids and sprays for larger projects.


Realign your beads to be sure this is the order you want them to appear in and get your stretchy cord ready!
Ready? String your beads!
Yay!! They look great, don't they?!
Tie your ends in two double knots, pulling tight to make sure they stay put. Chasing beads around on the floor is no fun!
Now- put them on! Show them off! These colors remind me of the county fair! Oh joy!!


New to my blog today is------- the KatScale !
And on the KatScale, this project is rated a 1. The easiest to make. And wear, for that matter.

Remember the summer. It'll be back.


Toodles.

Sunday, September 11, 2011

Flames of Fun!


This 3 1/2" tall glass bottle started life housing a spice. It is one of about 10 that were a set on a round metal 2-tiered perch. It's destiny would not be the trash after my greedy eyes spotted them and their possibilities. So they sat in the holding department for a few years waiting for my temperamental inspiration to kick in. Now that Fall is upon us here in central New York State, my idea rolodex is spinning fast. As a matter of fact, I could use a real rolodex for my unending lists of ideas. No, maybe not. I'd have to have one for each room. And my purse. Bad thought, there.
But a candle holder was it's true calling, being the candle fanatic that I am. Good thing, too, what with a hurricane and distructive flood, my stores are down. And it's time to make more Fall stuff.

Here's the little bottle, waiting for it's basecoat.
The cap went into the 'little things that need to be kept' bin.

The basecoat is done. On projects this size and larger, I use a high hiding white latex paint that I assume is meant for house interiors. It's an exceptional paint- thick and creamy, with excellent coverage and easy clean up.


Just before I started basecoating the bottle, I had a pretty good idea how I wanted the bottle to look. The primary colors would be black and purple with the flames growing up from the bottom to lick the rim. If you use the paint I did, you know it takes a little longer for it to dry thoroughly. Another project ITW (in the works) was worked on while it was drying. A good hour later, I pencilled in the flames, keeping the eraser handy for any boo-boos or whoa-where-are-you-going lines. Here's the result:

That was easy and painless.
Now- which purple? I love purple. Always have ever since I was given my choice of paint color as a kid. My selection of this color is limited, compared to all the other shades of colors I have available. I love paint. I love color, so you'd think with loving purple like I do, I'd have alot of shades. No. But the shades I do have are awesome. Violet Pansy won the draw.
Here's the first coat. I knew it would look like this, so a second coat was added after the first one dried.

Now I was getting excited. With the purple dry, it was time for some contrast. Just this little bit of black really got me going.
Luckily, only one coat of black was needed, but it made the holidays in the purple show up more than I expected. Purple is finicky. And fickle. What you think is done, isn't quite. So, a dab here and a dab there after the black was dry made me satisfied.
The paintbrush stopped at the rim. Hmm.
Looking without really seeing guided my hand to the Amethyst Metallic. I thought- why not? If I don't like it, I can paint over it. No problem. The first coat looked like this:
Okay. Not too shabby. The second coat looked well enough and didn't draw the eyes away from the flames for long.
I knew what was next and procrastinated by hunting down a short taper to A: see if it fit well in the hole without dropping through, and B: see how the over all project might look. Down in the bottom of the taper drawer was this little candle nub and it happened to be purple-ish. Ah ha. This is what I saw:

It's a little dull and drab and very old, but it served the purpose. So, at this point, I could no longer wait. I started the painstaking process of outlining the purple flames in Purple Glitter. Not fat lines, but just enough to give it a little bling. You might be able to just barely see the glitter in the picture above, and that's how it looked in person. It just wasn't enough. I stopped and waited for it to dry, trying to come up with another alternative.
The poor little candle nub needed help, so the black wavy lines and Silver Glitter outlines came about. It was okay for a quick fix. As the silver glitter was drying, I was happy to see how well it looked. It was worth a try, and there's always a repaint when it came to the bottle. The process started again with the glitter change.

Now, I've never tried overpainting glitter on glitter, so basically, this was an experiment. As the silver over the purple dried, it seemed to take on a life of it's own. Not straight silver with a hint of underlying purple. Hard to explain. But this made me happy.

I lit the candle this morning before the Sun came up and it looked pretty good. Just enough sparkle showed. In a darkened room, it's a sight!
My experiments in the past have brought me some beautifully surprising results. I'd have to say at least 85% of what I do is an experiment, and not many have been flubs or duds. The many paint mediums and different supplies I have on had are fun to play with. So, don't be afraid to play. Go out on a limb, but hang on to that least leaf. If you drop, you'll most likely end up in a freshly raked leaf pile. What a way to go!

Have fun. Be creative. Enjoy the harvest.


Toodles.